


HOW TO CREATE ALMOST FREE PROFESSIONAL WEBSITE IN SIMPLE AND EASY WAY
We will help you how to create almost free professional website in simple and easy way, with wordpress content management system, and what is most important it’s very fast.
You don’t need to think about:
- How to find the right developer who can create your website
- You don’t need any skills in programming, tools or plugins – it’s really easy
- You can choose from so many different FREE mobile-friendly professional templates for your website for any business with just one click
- You will get the most popular content management system in the world – wordpress
WHY WORDPRESS INSTEAD OF OTHER SO MANY OPTIONS?
Because WordPress is the most popular content management system in the world there are so many futures already programmed, you can easily use them without any programming skills and most importantly most of them are FREE
WordPress is using celebrities and big companies in the world, like:
CELEBRITIES


COMPANIES


And of course WordPress system is very simple and easy to use.
HOW IT WORKS? WE WILL GO THROUGH 3 STEPS
- Internet address and server (domain name and hosting)
- Install a content management system for your website
- Design your new website
1 INTERNET ADDRESS IN OTHER WORDS DOMAIN NAME AND SERVER FOR YOUR WEBSITE
An Internet address (domain) is needed so everyone can find you via your address on the internet. For example, a youtube domain name is youtube.com and a server is needed to make your website available 24 hours a day and 7 days a week for everyone.
There are so many options for choosing server provider for your website, but I will suggest the most stable and popular ones in the world:
Also, if you want you can google to find what can offer to you other hosting providers
But in this case, I will use Hostgator.com
The only 2 steps that cost any money is your server, domain name, and professional design template. But without this, you can not have your website available on the Internet. So let’s get started with hosting and domain name.
In your browser go to https://www.hostgator.com/web-hosting
If you just one to create one website with only one domain name, I highly recommend you to use HostGator’s “hitchling plan”, later if you want some more options you can always upgrade to another plan. But to start it’s enough “hitching plan”.
If you already have a domain name you can use the “I already own this domain” section, if not “Register a new domain”
What should be mentioned?
You can select the period for which you will receive server services “Billing Cycle”. You can select from 1 month to 36. You will be notified before the end of the server service and you can always upgrade it.
Also, you can add Additional Services like:
*SSL Certificate – Ensures that visitor data (credit cards, passwords, etc.) is secure and protected.
*SiteLock Essentials – Protects your website by automatically downloading site data, screening it, removing malware, and uploading a clean version to restore your site.
*Professional Email – Add email, calendar, cloud storage with OneDrive, video conferencing with Microsoft Teams, and more. Powered by Microsoft Office 365.
*Site Backup – It’s insurance for your website. Get daily automated website backup for all web files and databases with a 1-click restore.
*HostGator SEO Tools – Provides you with easy-to-follow insights and analytics that help improve your search rankings, boost your website traffic, and monitor local competition.
And of course, if you have one you can use a discount coupon code.
2 INSTALL A CONTENT MANAGEMENT SYSTEM FOR YOUR WEBSITE
After purchasing the server, you can install a content management system(CMS). To install CMS you can use 2 options
a) Install WordPress with Auto Installer
b) Install WordPress Manually
a) How to Install WordPress with Auto Installer
The easiest way to install WordPress is to choose a host that does it for you. Many hosts make this process a breeze, but we will show you how setting up WordPress on Hostgator.com is a quick and easy process thanks to its one-click installer:
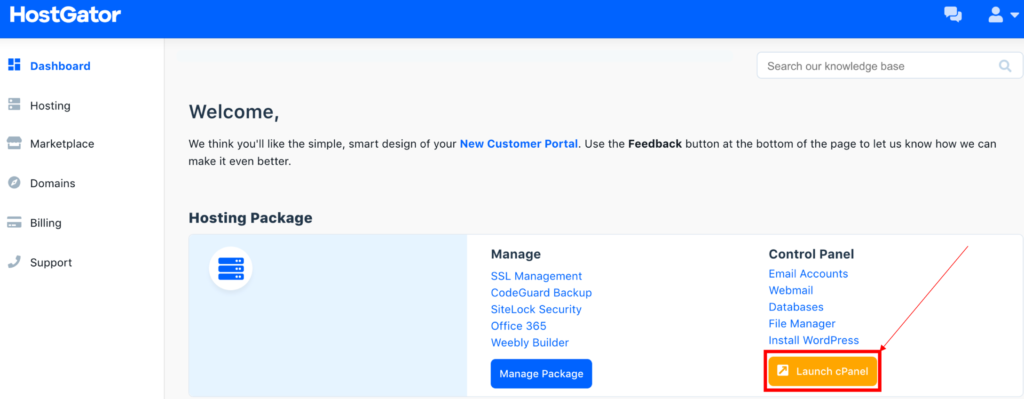
- Log in to your “Hostgator customer portal” and from the “DASHBOARD” section choose “Launch cPanel”.
2. In the “HostGator control panel” click on the WordPress Installer icon, fill in the required fields, and click Install.

b) How to Install WordPress Manually (you can skip this step if you already did it with option a
If the automatic WordPress installer doesn’t seem to be working, or it’s not available in your hosting, you can install WordPress manually. Follow the steps below for an easy installation process.
PREPARING THE WORDPRESS INSTALL
Before we begin the installation process, let’s set up a few things first:
- Download the latest version of WordPress: https://wordpress.org/download/
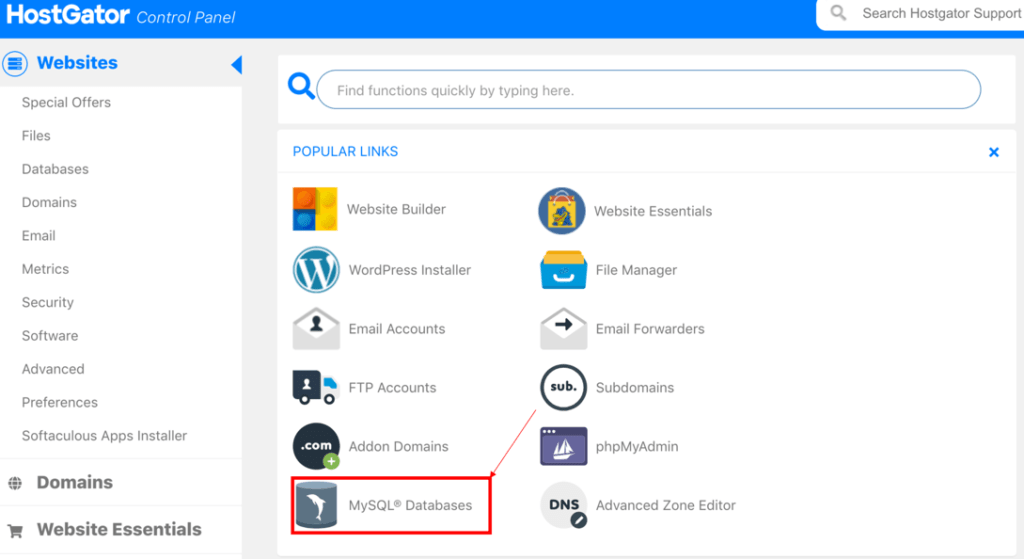
- Next, we need to create a database and user. So, log in to your “Hostgator Control Panel” and go to MySQL Database under the Database section. After filling in the required fields, press Create.

3. First you need to create a new database. The name of the database can be your website name or whatever you want, this database name later will be used for WordPress installation, so make sure to copy it. In this case, I just use the Database name: “New”

4. Now you need to create a new user name for your database. The name can be whatever you want, this user name later will be used for WordPress installation, so make sure to copy it. In this case, I just use the name: “User” and to create a password you can use yours or generate one with “Password Generator”, name and password later will be used for WordPress installation, so make sure to copy it.

5. Now you must add User to created Database

6. Make sure to give all database privileges to the user

IMPORTANT: Make sure to copy the MySQL and USER credentials complete with the alphanumerical strings–you will need them later.
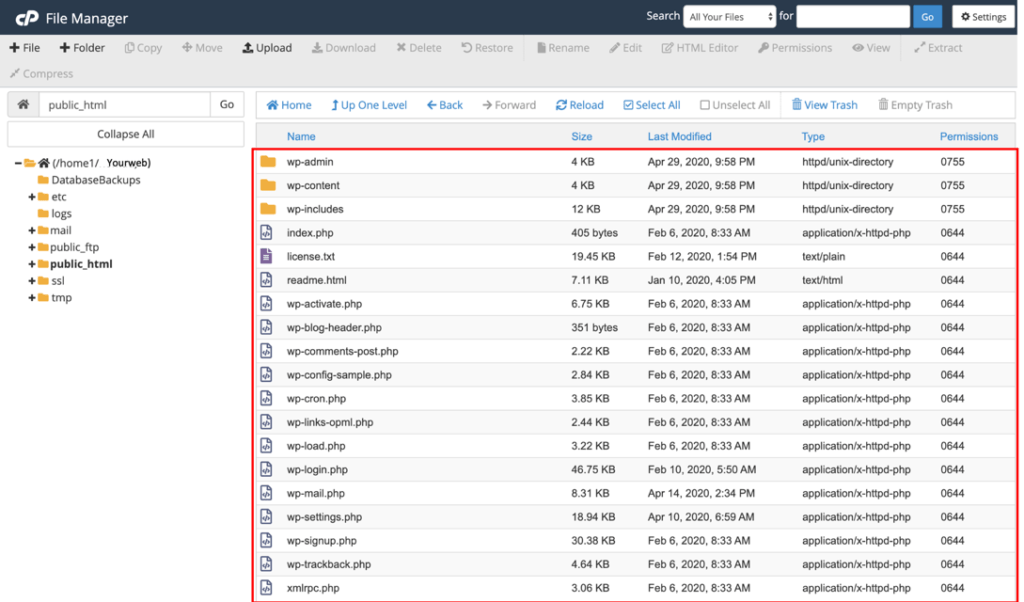
7. Next go to your Hostgator control panel and in the Files section click on File Manager.

8. Click and expand the file public_html.

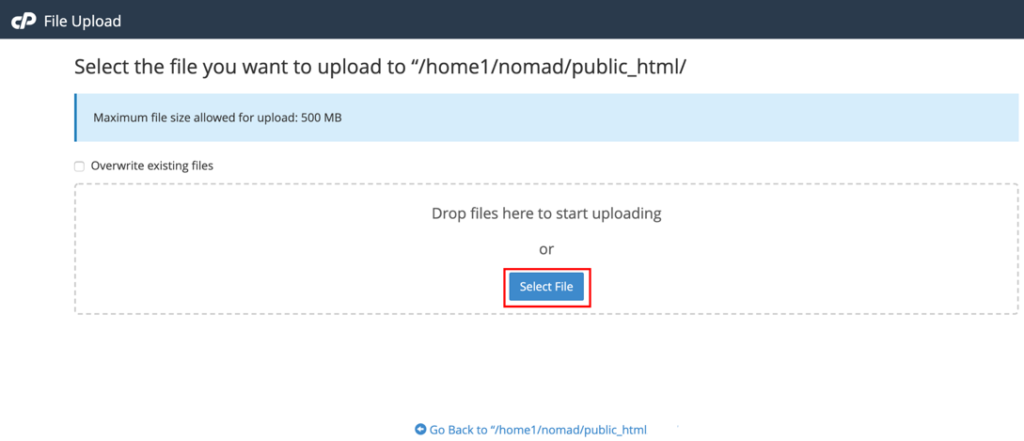
9. If in the “public_html” folder there are any files you can remove them. Choose the “Upload” file in the menu when “Select File” and choose your downloaded WordPress file (https://wordpress.org/download/) to upload to the server.


10. After uploading WordPress to the server come back to file manager and click on the wordpress.zip file right mouse button to “Extract” all files
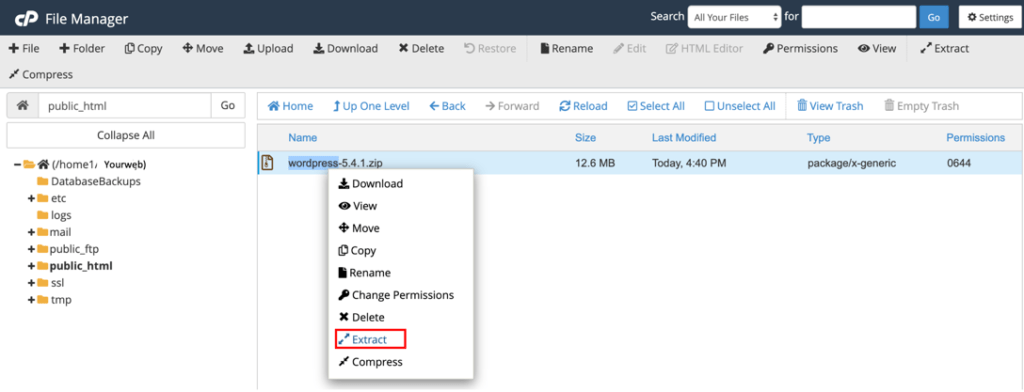
11. After uploading WordPress to the server comeback to “File Manager” and click on the wordpress*.zip file right mouse button to “Extract” all files

12. All files after extraction must be in the “/Public_html” folder, not in “/Public_html/wordpress” otherwise you cannot install the WordPress system. Please have a look at the example below.
13. Installing WordPress
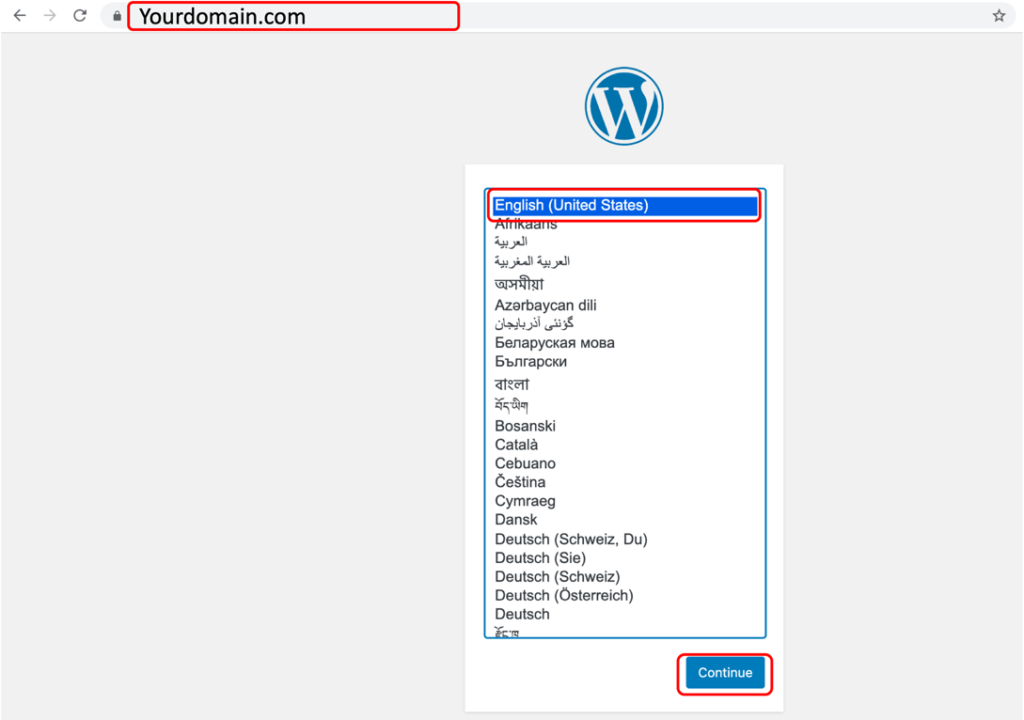
Now that we have the preparation stage covered, we can proceed with the installation process. Open the browser (Chrome, Mozilla, or whatever you use) and access your domain name (for example: yourdomain.com) to open the setup page. The WordPress 5-minute installation wizard only has five steps in total:
13.1 Select your language and press Continue.
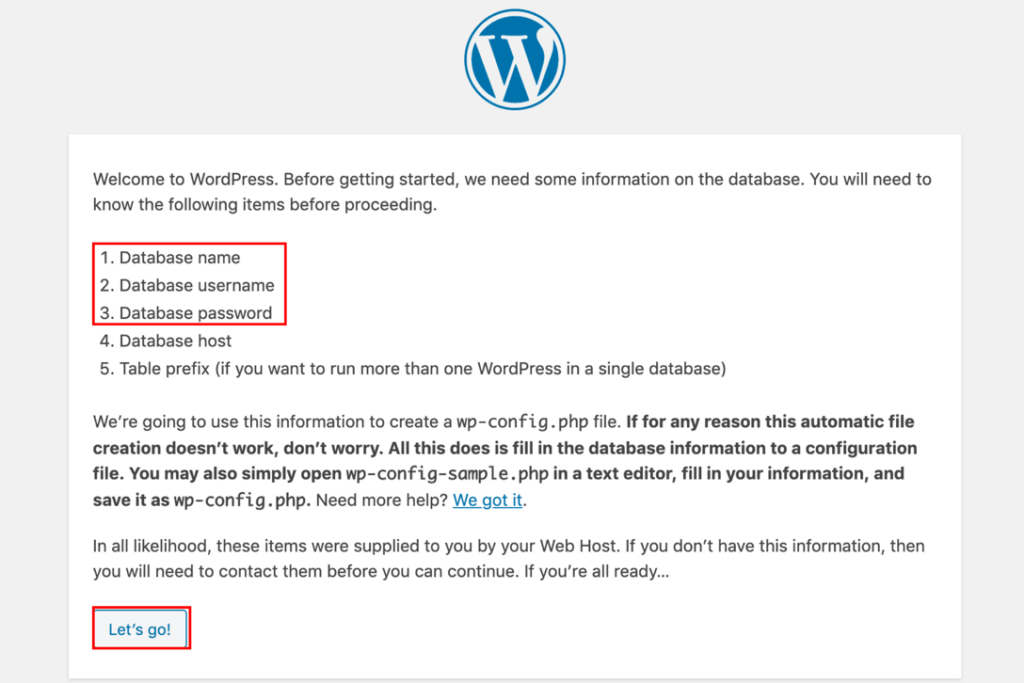
13.2 WordPress will ask to collect the MySQL details. Since you already have them, press Let’s go!
13.3 Enter the MySQL database credentials. You may leave the Database Host and the Table Prefix fields as they are. Only change the latter if you wish to run multiple installations inside one database. Click Submit.

13.4 WordPress will check whether it’s possible to connect to the MySQL database you have created. If there are no errors, select Run the Installation.
13.5 Fill the website and the administrator’s information. Install WordPress to finalize the process. You can now press the Login button to access the WordPress admin area. Normally you can locate your website administration panel at yourdomain.com/wp-admin
3 DESIGN YOUR NEW WEBSITE
There are a few options available:
3.1 First one is just buying a professional template for your website and you can do so with the links below:
In this case, often design provider gives you full instructions on how to install and configure the theme to your WordPress website. You can always customize your template using https://wpbakery.com WordPress plugin.
3.2 Second one is using https://elementor.com this option let you create your own custom design. This is for simplest template and content management. This is really easy and simple to do. How to install and configure “Elementor” you can see here: https://docs.elementor.com/article/14-installation
